Hello all,
I am trying to use tiled clones to make a polka dot pattern. I've had some success, but the dots are arranged in a kind of parallelogram and I am looking for a rectangular arrangement.
I have attached a couple of images, one of my settings (all I have changed is the stuff under the Shift tab), and one of the end result. I know it's because I don't fully understand all of the settings but if somebody could give me a clue then that would be great!
Thanks,
Nick.
Polka Dots!
Polka Dots!
- Attachments
-
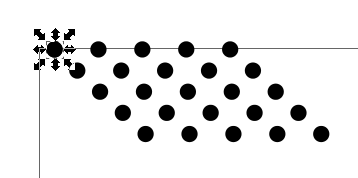
- The dots
- dots.PNG (6.98 KiB) Viewed 4860 times
-
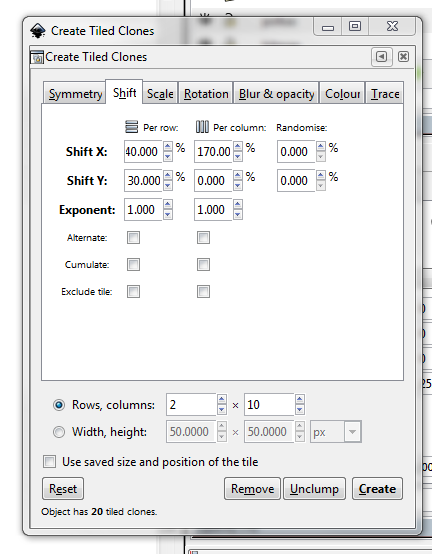
- My settings
- dialogue_tiled_clones.PNG (42.9 KiB) Viewed 4860 times
-
Espermaschine

- Posts: 892
- Joined: Thu Jun 05, 2014 9:10 pm
Re: Polka Dots!
you could just tile one or two lines , group them, and tile them again
Re: Polka Dots!
Hi.
Simplest way to create a grid is to use P1, Simple translation.
Tick off the "Use saved size and position of the tile" checkbox.
Click "Reset" to get rid of all previous scale and translations.
Specify the size in rows and columns and click "Create".
The objects will then "touch" each other, to create "space" between the objects I just scale the original object using the transform - scale dialog (Shift Ctrl M), then create the grid using tiled clones and then scale "back" the object to the original size. For instance if I have circles 10 pixels and I want them to be 20 pixels apart I scale to 300%, perform the tiled clones, and scale the original back to 33.333%.
Last edited by ragstian on Mon Mar 30, 2015 1:32 am, edited 3 times in total.
Good Luck!
( ͡° ͜ʖ ͡°)
RGDS
Ragnar
( ͡° ͜ʖ ͡°)
RGDS
Ragnar
Re: Polka Dots!
Ah! That's it  Thank you, Espermaschine, my friend and for everyone else (and my own reference, in case I forget), here are the settings I used in the second tiling!
Thank you and have a great day.
Nick.
Thank you and have a great day.
Nick.
- Attachments
-

- dialogue_tiled_clones_2.PNG (41.26 KiB) Viewed 4850 times
Re: Polka Dots!
Brilliant, thank you for that - I will also try that method to see how it works out for me.ragstian wrote:Hi.
Simplest way to create a grid is to use P1, Simple translation.
Tick off the "Use saved size and position of the tile" checkbox.
Specify the size in rows and columns and click "Create".
The object will then "touch" each other, to create "space" between the objects I just scale the object using the transform - scale dialog (Shift Ctrl M), then create the grid using tiled clones and then scale "back" the object to the original size. For instance if I have circles 10 pixels and I want them to be 20 pixels apart I scale to 300%, perform the tiled clones, and scale back to 33.333%.
Nick.
-
Espermaschine
- Posts: 892
- Joined: Thu Jun 05, 2014 9:10 pm
Re: Polka Dots!
ragstian wrote:The objects will then "touch" each other, to create "space" between the objects I just scale the original object using the transform - scale dialog (Shift Ctrl M), then create the grid using tiled clones and then scale "back" the object to the original size. For instance if I have circles 10 pixels and I want them to be 20 pixels apart I scale to 300%, perform the tiled clones, and scale the original back to 33.333%.
cool trick !
but how do you get the diagonal lines OP has in his example ?
Re: Polka Dots!
You can also try to create a custom pattern fill.
For example, draw a rectangle of the tile size,
center the polka dot on it with the align and distribute panel (Shift+Ctrl+A),
group the two objects together.
Then, clone it (Alt+D) and make a custom pattern fill from the clone.
After that you can change the rectangle in the parent group to transparent or delete it.
On 0.48 though, you have to adjust the pattern handles to "refresh" the changes in the clone, probably already fixed in the current stabile.
Re: Polka Dots!
This is a video tutorial on how to make polka dots pattern in Inkscape
https://www.youtube.com/watch?v=o17B4PK7vDA&t=3s
https://www.youtube.com/watch?v=o17B4PK7vDA&t=3s

Re: Polka Dots!
Espermaschine wrote:but how do you get the diagonal lines OP has in his example ?
If you look in the original post settings you will see an x shift in both row and column this means that each new row starts shifted over if you want the diagonal pattern but not have the fill shaped like a parallelogram you can check the alternating box
However if you want this, which is diagonal but with spaces:
- dotsglide.png (22.95 KiB) Viewed 3057 times
it's a bit of what Ragnar said but used differently - check the use saved box, then do the tiled clones using the PG symmetry, scale down and move the original to a corner of the imagined box it was in. You can use the P1 symmetry and shift each row in the x direction with the alternate box checked to get the same result too.
Your mind is what you think it is.
Re: Polka Dots!
This is a video on how to create the seamless polka dots pattern with the P1 wallpaper group in Inkscape and how to make it an SVG vector
https://inkscape.org/~Damry/%E2%98%85ho ... ern-vector
https://inkscape.org/~Damry/%E2%98%85ho ... ern-vector