Hi,
when I assign a border to an object, such as a text, the border it expands towards the object and to the exterior of the object. Would it be possible to make it expand only towards the outside?
Thanks
Regards
Marco
Border only towards the outside
-
tylerdurden
- Posts: 2344
- Joined: Sun Apr 14, 2013 12:04 pm
- Location: Michigan, USA
Re: Border only towards the outside
The fill and stroke dialog has tools for "paint order" which provide the ability to place the fill in front of the stroke, so that only the half of the stroke outside the path is shown.
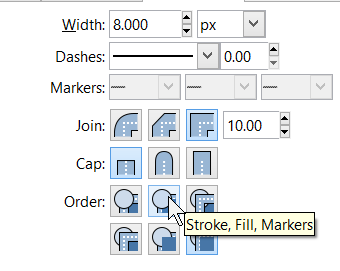
- paint-order.png (11.77 KiB) Viewed 1582 times
Have a nice day.
I'm using Inkscape 0.92.2 (5c3e80d, 2017-08-06), 64 bit win8.1
The Inkscape manual has lots of helpful info! http://tavmjong.free.fr/INKSCAPE/MANUAL/html/
I'm using Inkscape 0.92.2 (5c3e80d, 2017-08-06), 64 bit win8.1
The Inkscape manual has lots of helpful info! http://tavmjong.free.fr/INKSCAPE/MANUAL/html/
Re: Border only towards the outside
That's been a requested feature for a long time, but still not possible. Besides tylerdurden's suggestion, another suggestion would be to make the outline into a separate object.
There are probably a couple of ways to do that. Since I'm not sure if you might already know how, I'll wait for you to ask before I explain.
There are probably a couple of ways to do that. Since I'm not sure if you might already know how, I'll wait for you to ask before I explain.
Basics - Help menu > Tutorials
Manual - Inkscape: Guide to a Vector Drawing Program
Inkscape Community - Inkscape FAQ - Gallery
Inkscape for Cutting Design
Manual - Inkscape: Guide to a Vector Drawing Program
Inkscape Community - Inkscape FAQ - Gallery
Inkscape for Cutting Design
-
mar_gian60
- Posts: 5
- Joined: Thu Sep 27, 2018 8:25 pm
Re: Border only towards the outside
Hi,
Thanks for your answers
I use inkscape in linux mint 18, and in the fill and stroke window, the order option not there is. But in windows 8.1 I have found it.
This is possible?
Instead regarding the suggestion of brynn, I have no idea how to do it.
I would be happy if you could give me some indication.
Thanks to both of the tips
Marco
Re: Border only towards the outside
Linux Mint 18 only provides an older version of Inkscape by default. But you can use the ppa instead:
https://launchpad.net/~inkscape.dev/+ar ... ntu/stable
https://launchpad.net/~inkscape.dev/+ar ... ntu/stable
Something doesn't work? - Keeping an eye on the status bar can save you a lot of time!
Inkscape FAQ - Learning Resources - Website with tutorials (German and English)
Inkscape FAQ - Learning Resources - Website with tutorials (German and English)
-
mar_gian60
- Posts: 5
- Joined: Thu Sep 27, 2018 8:25 pm
Re: Border only towards the outside
THANKS!!!
Re: Border only towards the outside
There are a couple of ways to make the stroke into a separate object.
1 - duplicate the object (Edit menu > Duplicate, or this button or there's probably a key shortcut, search at Help menu > Key and Mouse Ref)
2 - for the original object (which is now underneath the duplicate) remove the stroke, leaving only the fill color
3 - for the duplicate, remove the fill color, leaving only the stroke
4 - select the duplicate (on top) and do Path menu > Stroke to path (this changes the stroke into a path)
5 - switch to the Node tool and you can see the nodes for this new path
6 - set up Snapping (along the right edge of the window) like I have showing in the attached screenshot - this will make nodes snap to nodes
7 - using the Node tool, drag the inner nodes and snap them to the nodes on the original object, which is still showing there
Other way:
1 - duplicate the object
2 - for the original object on the bottom, remove the fill color, leaving only the stroke
3 - for the duplicate on top, remove the stroke, leaving only the fill color
4 - duplicate the top one again
5 - select the one on top and the one on the bottom (don't select the one in the middle) (let us know if you need instructions for this)
6 - Path menu > Difference
1 - duplicate the object (Edit menu > Duplicate, or this button
or there's probably a key shortcut, search at Help menu > Key and Mouse Ref)2 - for the original object (which is now underneath the duplicate) remove the stroke, leaving only the fill color
3 - for the duplicate, remove the fill color, leaving only the stroke
4 - select the duplicate (on top) and do Path menu > Stroke to path (this changes the stroke into a path)
5 - switch to the Node tool
and you can see the nodes for this new path6 - set up Snapping (along the right edge of the window) like I have showing in the attached screenshot - this will make nodes snap to nodes

- snap-basic.png (5.32 KiB) Viewed 1426 times
7 - using the Node tool, drag the inner nodes and snap them to the nodes on the original object, which is still showing there
Other way:
1 - duplicate the object
2 - for the original object on the bottom, remove the fill color, leaving only the stroke
3 - for the duplicate on top, remove the stroke, leaving only the fill color
4 - duplicate the top one again
5 - select the one on top and the one on the bottom (don't select the one in the middle) (let us know if you need instructions for this)
6 - Path menu > Difference
Basics - Help menu > Tutorials
Manual - Inkscape: Guide to a Vector Drawing Program
Inkscape Community - Inkscape FAQ - Gallery
Inkscape for Cutting Design
Manual - Inkscape: Guide to a Vector Drawing Program
Inkscape Community - Inkscape FAQ - Gallery
Inkscape for Cutting Design