
- 3d-Stars-And-Stripes-America-777x437.jpg (46.63 KiB) Viewed 2144 times
FLAT SUN SPOKE EFFECT
FLAT SUN SPOKE EFFECT
Hello, i would like if someone could help me how to achieve that flat spoke/beam effect like this one in the attached picture. Is there a way how to generade that beams? Thank you in advance you answear back to me.
Re: FLAT SUN SPOKE EFFECT
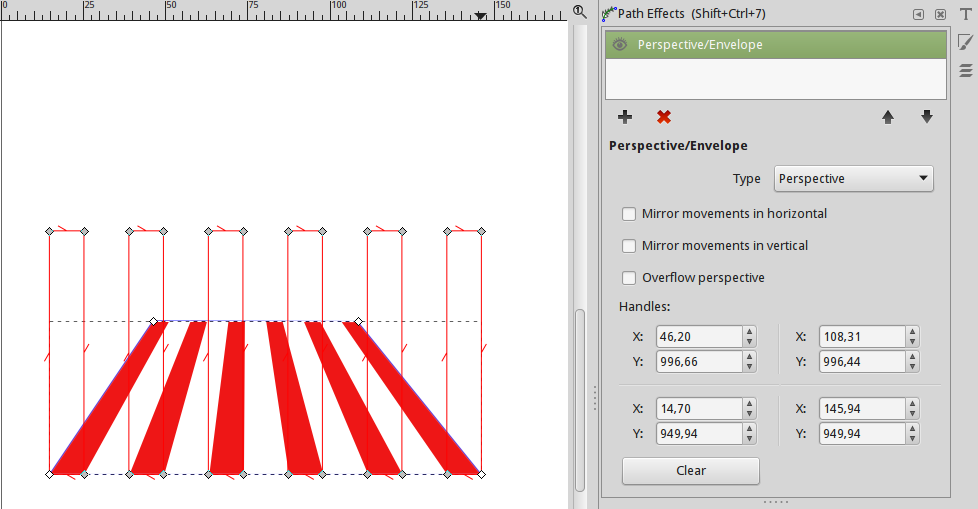
In Inkscape 0.92.1, you can use the Envelope/Perspective Path Effect for this.
Create a rectangle.
Multiply it and arrange at regular distances using Align+Distribute dialog.
Select all rectangles, do Path -> Combine.
Apply path effect via Path -> Path Effects -> + -> Envelope/Perspective
Play with the Path Effect's handles (using node tool) or set their positions using the numeric input fields.
Looks like the attached image then. To get just a part of that, like in your image, you can create a rectangle and overlay it, then use Path -> Intersection.
- Attachments
-
- Bildschirmfoto_2017-02-20_01-16-18.png (55.55 KiB) Viewed 2132 times
Something doesn't work? - Keeping an eye on the status bar can save you a lot of time!
Inkscape FAQ - Learning Resources - Website with tutorials (German and English)
Inkscape FAQ - Learning Resources - Website with tutorials (German and English)
Re: FLAT SUN SPOKE EFFECT
Yesss! It works perfectly. You made my day. Thank you very much
Re: FLAT SUN SPOKE EFFECT
This is one of those things where there are a few different ways to do this. I usually take the raw path approach.
I would start with a star with something like 18 spikes. Use the points of the star to snap the starting point of a new path, and end the path snapped to the center of the star. So you'll end up with 18 paths which all meet at one point, in the center of the star. Move the star out of the way, since it's not needed anymore.
Select all the 18 straight paths. Switch to the Node tool if not already using. Then draw a little selection box around the middle nodes, to select all of them. Hold the Ctrl key, and drag them straight up. At some certain point, you'll see the effect you're after.
Some additional work would be needed to add the color. I would need a lot more info about your project, to be able to say the best way to add color.
Basics - Help menu > Tutorials
Manual - Inkscape: Guide to a Vector Drawing Program
Inkscape Community - Inkscape FAQ - Gallery
Inkscape for Cutting Design
Manual - Inkscape: Guide to a Vector Drawing Program
Inkscape Community - Inkscape FAQ - Gallery
Inkscape for Cutting Design
Re: FLAT SUN SPOKE EFFECT
Hello brynn, yes i just tryed that approach you hinted me. It works good to as well as the first method hinted by Moini. So but i got a little trouble to colorize it in order to achieve that nice color effect. I can colorize it at all but every second segment. Could you hint me please how to do it? Thank you very much.
Re: FLAT SUN SPOKE EFFECT
Ok, so here's some more.
I decided to make a square around it, because I assume that's probably where you're headed. So after you make the effect, draw a square that you want to represent the outer border of the drawing, and put it in place.
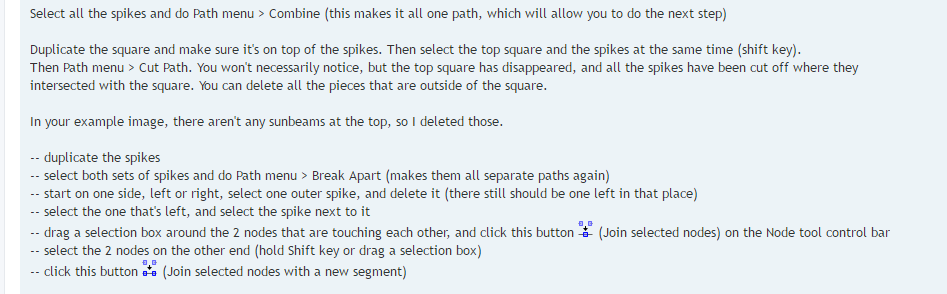
Select all the spikes and do Path menu > Combine (this makes it all one path, which will allow you to do the next step)
Duplicate the square and make sure it's on top of the spikes. Then select the top square and the spikes at the same time (shift key).
Then Path menu > Cut Path. You won't necessarily notice, but the top square has disappeared, and all the spikes have been cut off where they intersected with the square. You can delete all the pieces that are outside of the square.
In your example image, there aren't any sunbeams at the top, so I deleted those.
-- duplicate the spikes
-- select both sets of spikes and do Path menu > Break Apart (makes them all separate paths again)
-- start on one side, left or right, select one outer spike, and delete it (there still should be one left in that place)
-- select the one that's left, and select the spike next to it
-- drag a selection box around the 2 nodes that are touching each other, and click this button (Join selected nodes) on the Node tool control bar
-- select the 2 nodes on the other end (hold Shift key or drag a selection box)
-- click this button (Join selected nodes with a new segment)
So now it's a closed path, and you can click a color on the palette to fill it, or use the Fill and Stroke dialog (Object menu). Or I would wait until I've gone all the way around and finished all of them, before I add the color. Whatever you want to do.
After you finish the first triangle, the first spike for the 2nd triangle might be under the first one. If you can't seem to select it, here's how. Deselect the first triangle. Position your mouse over the edge of the first triangle, hold the Alt key, and click twice. That will select the path that's underneath, even though you can't see it. Keep an eye on the status bar to make sure you have the right thing selected. It will say "Path (2 nodes)....". If you've selected the triangle, it will say 3 nodes.
So when you have the spike selected, hold Shift, and select the next one over. Then you can just repeat the process all the way around. (You will end up with an extra spike at the end, and you can just delete it.
Oh, if you have a sunbeam that covers a corner, well, you'll see what happens. Double-click on the path with the Node tool. That adds a new node. Then you can just snap that node to the corner.
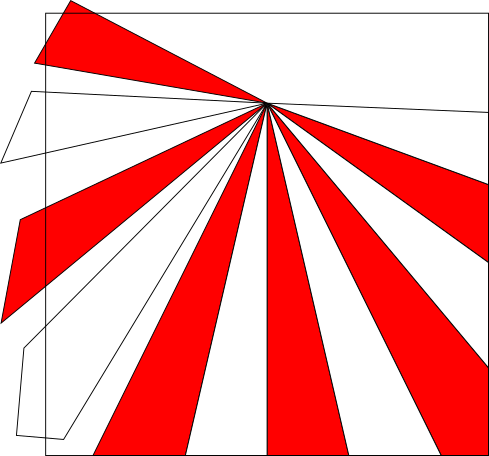
Here's my quick and very raw result. You can see that instead of 18, or any even number of spikes on the original star, we should use some odd number of spikes. That way, we'll end up with both of the top sunbeam/triangles being the same color.
Also, mine's not as flat-looking as your example. But you can make it flatter by dragging those middle nodes up farther. If you wanted to spend even more time on it, you could experiment with the Perspective extension. It can be tricky to use, and I wouldn't call it exactly a newbie tool. I think I might use more spikes next time too, if I were still not satisfied. Maybe 25. Here's the manual info on the Perspective extension. Read it very carefully, because the steps are really important. http://tavmjong.free.fr/INKSCAPE/MANUAL ... erspective
I decided to make a square around it, because I assume that's probably where you're headed. So after you make the effect, draw a square that you want to represent the outer border of the drawing, and put it in place.
Select all the spikes and do Path menu > Combine (this makes it all one path, which will allow you to do the next step)
Duplicate the square and make sure it's on top of the spikes. Then select the top square and the spikes at the same time (shift key).
Then Path menu > Cut Path. You won't necessarily notice, but the top square has disappeared, and all the spikes have been cut off where they intersected with the square. You can delete all the pieces that are outside of the square.
In your example image, there aren't any sunbeams at the top, so I deleted those.
-- duplicate the spikes
-- select both sets of spikes and do Path menu > Break Apart (makes them all separate paths again)
-- start on one side, left or right, select one outer spike, and delete it (there still should be one left in that place)
-- select the one that's left, and select the spike next to it
-- drag a selection box around the 2 nodes that are touching each other, and click this button
(Join selected nodes) on the Node tool control bar-- select the 2 nodes on the other end (hold Shift key or drag a selection box)
-- click this button
(Join selected nodes with a new segment)So now it's a closed path, and you can click a color on the palette to fill it, or use the Fill and Stroke dialog (Object menu). Or I would wait until I've gone all the way around and finished all of them, before I add the color. Whatever you want to do.
After you finish the first triangle, the first spike for the 2nd triangle might be under the first one. If you can't seem to select it, here's how. Deselect the first triangle. Position your mouse over the edge of the first triangle, hold the Alt key, and click twice. That will select the path that's underneath, even though you can't see it. Keep an eye on the status bar to make sure you have the right thing selected. It will say "Path (2 nodes)....". If you've selected the triangle, it will say 3 nodes.
So when you have the spike selected, hold Shift, and select the next one over. Then you can just repeat the process all the way around. (You will end up with an extra spike at the end, and you can just delete it.
Oh, if you have a sunbeam that covers a corner, well, you'll see what happens. Double-click on the path with the Node tool. That adds a new node. Then you can just snap that node to the corner.
Here's my quick and very raw result. You can see that instead of 18, or any even number of spikes on the original star, we should use some odd number of spikes. That way, we'll end up with both of the top sunbeam/triangles being the same color.
Also, mine's not as flat-looking as your example. But you can make it flatter by dragging those middle nodes up farther. If you wanted to spend even more time on it, you could experiment with the Perspective extension. It can be tricky to use, and I wouldn't call it exactly a newbie tool. I think I might use more spikes next time too, if I were still not satisfied. Maybe 25. Here's the manual info on the Perspective extension. Read it very carefully, because the steps are really important. http://tavmjong.free.fr/INKSCAPE/MANUAL ... erspective
- Attachments
-

- rwb.png (25.23 KiB) Viewed 2057 times
Basics - Help menu > Tutorials
Manual - Inkscape: Guide to a Vector Drawing Program
Inkscape Community - Inkscape FAQ - Gallery
Inkscape for Cutting Design
Manual - Inkscape: Guide to a Vector Drawing Program
Inkscape Community - Inkscape FAQ - Gallery
Inkscape for Cutting Design
Re: FLAT SUN SPOKE EFFECT
Hi brynn i have been trying that approach how to colorize every one spike you posted me and it works very well. So you are perfect. I LEARNT a new things. Thank you very much.
Re: FLAT SUN SPOKE EFFECT
You're welcome. And you learned something from Moini too!
Basics - Help menu > Tutorials
Manual - Inkscape: Guide to a Vector Drawing Program
Inkscape Community - Inkscape FAQ - Gallery
Inkscape for Cutting Design
Manual - Inkscape: Guide to a Vector Drawing Program
Inkscape Community - Inkscape FAQ - Gallery
Inkscape for Cutting Design
Re: FLAT SUN SPOKE EFFECT
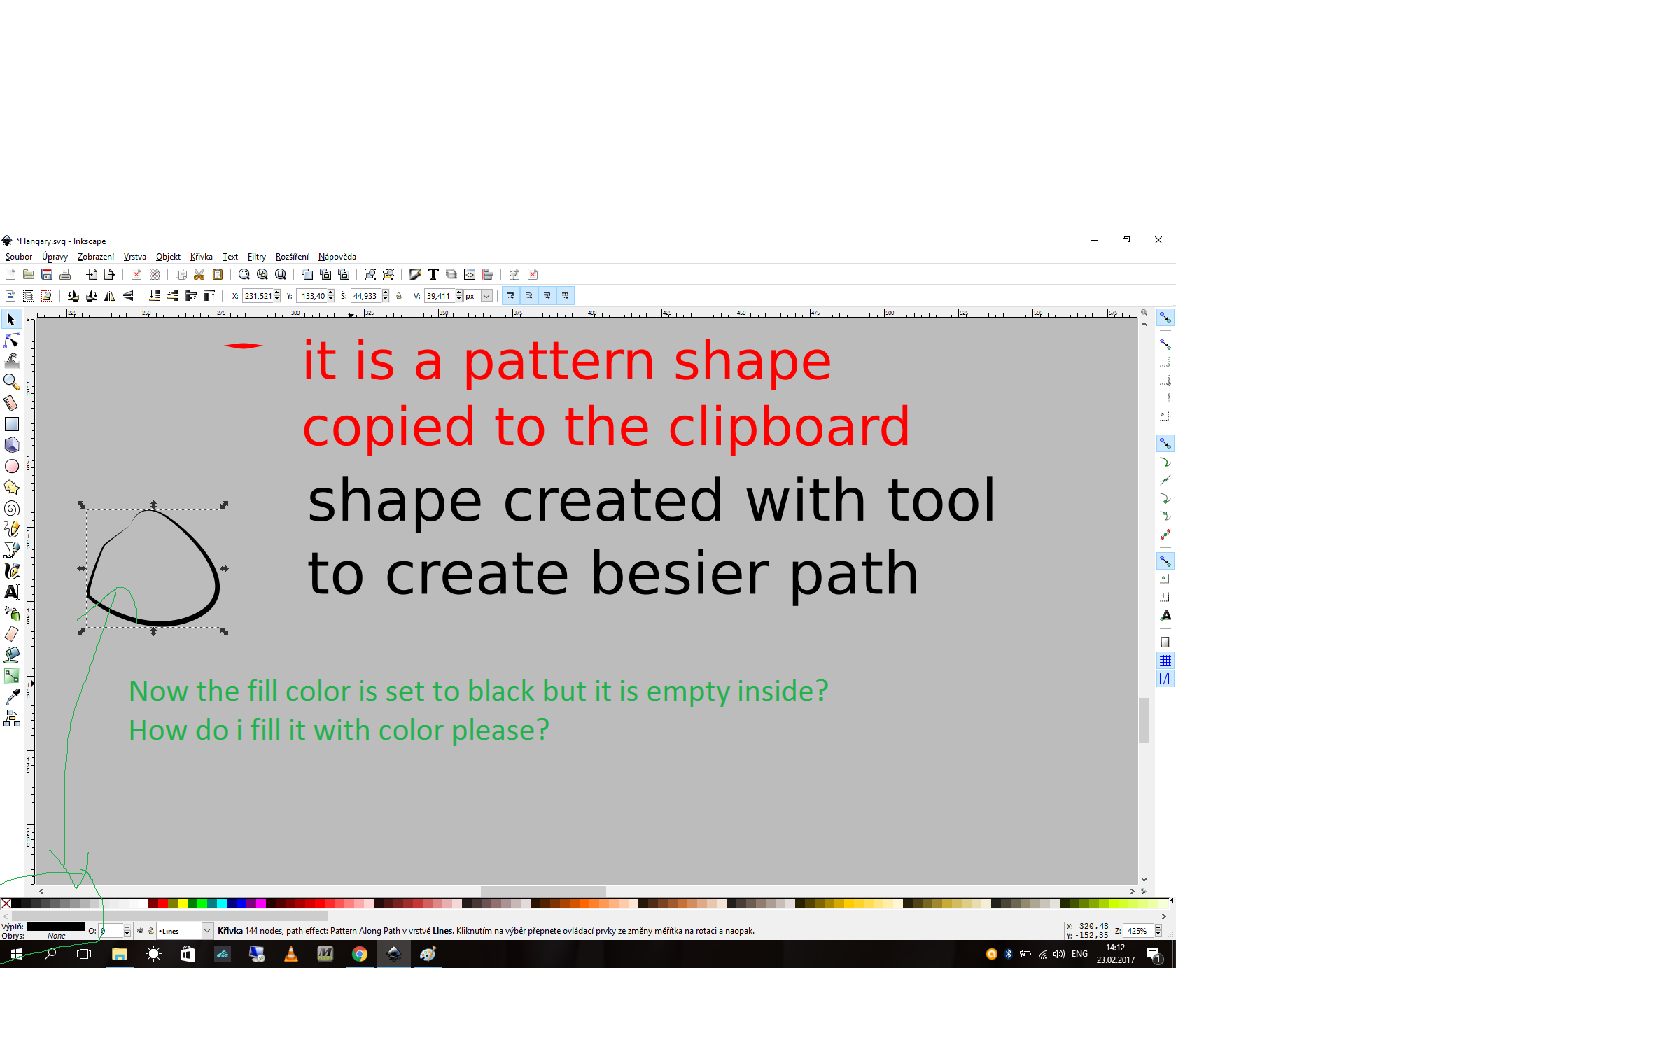
Hello yes you are right. I did : ) But let me ask a question: If i draw a shape with bezier path tool, mode: regular bezier path, shape: from clipboard then im not able to fill it inside with a color. While if i draw a shape with bezier path tool, mode: regular bezier path, shape: none then it can be filled in with a color. Please how do i achieve to fill with color that first shape? Thank you very much for your back response to me.
- Inkscape_Forum_Com.png (118.43 KiB) Viewed 1971 times
Re: FLAT SUN SPOKE EFFECT
Use the 'Clone original' path effect to achieve that. It's an advanced concept, though, so you may need to experiment a little to get it working.
Something doesn't work? - Keeping an eye on the status bar can save you a lot of time!
Inkscape FAQ - Learning Resources - Website with tutorials (German and English)
Inkscape FAQ - Learning Resources - Website with tutorials (German and English)
Re: FLAT SUN SPOKE EFFECT
Or a simpler or more basic solution. You could have a regular path hiding underneath the pattern along path path (that's what the Shape: From Clipboard does, is automatically apply pattern along path).
And after you add a fill color to the regular path, you can remove the stroke completely, and it won't show through, in case the clipboard shape is very narrow in some places.
In fact, you could draw the regular path first, then Duplicate. Add a fill color to the original, and remove the stroke. Select the duplicate, then open Path menu > Path Effects. (It's the LPE dialog, where you would also look for the LPE Moini suggested. But these are very separate and different effects.) Choose Pattern Along Path. Then click the Paste button in the LPE dialog. It pastes the same shape that you have on the clipboard already. This is no difference from using the Pen/Bezier tool with Shape: From Clipboard. They both do the same thing, except the Pen tool may be considered faster.
I actually haven't tried the new LPE that Moini mentioned. But I'm going to give it a try later, as soon as I get through checking messages and email. If it seems to cut the work load, I'll explain how to use it.
Basics - Help menu > Tutorials
Manual - Inkscape: Guide to a Vector Drawing Program
Inkscape Community - Inkscape FAQ - Gallery
Inkscape for Cutting Design
Manual - Inkscape: Guide to a Vector Drawing Program
Inkscape Community - Inkscape FAQ - Gallery
Inkscape for Cutting Design
Re: FLAT SUN SPOKE EFFECT
Hhm, can't seem to find any info about that Clone Original LPE. Searched Jabier's yt videos, searced the wiki, searched the internet, search his InkSpace (gallery on the website).
I can't find anything about it, and it's not at all clear how to use it, by just applying the effect to a path.
-- draw path
-- apply Clone Original LPE
-- draw a pattern, such as you'd use for pap
-- copy it
-- paste button in Clone Original dialog
It appears to clone the pattern object. So I'm not clear how this can be used here. At the moment, I don't see how it's any different from a regular clone. But it's not cloning the original path. It's cloning the pattern.
So if you draw just some random path, and apply the LPE, and then copy the triangle path you you learned how to make, and paste that into the dialog, it will clone that path (the random path disappears). But it's behaving just like a regular clone, so clearly I haven't found whatever the feature is that makes it special.
Still testing
Basics - Help menu > Tutorials
Manual - Inkscape: Guide to a Vector Drawing Program
Inkscape Community - Inkscape FAQ - Gallery
Inkscape for Cutting Design
Manual - Inkscape: Guide to a Vector Drawing Program
Inkscape Community - Inkscape FAQ - Gallery
Inkscape for Cutting Design
Re: FLAT SUN SPOKE EFFECT
Hello brynn, i get a problem caused to coloring sunbeams. Lets say i can draw e.g about 4 sunbeams with bezier path tool. Then im going to colorize it. But i can fill with color only the first one sunbeam and the third one sunbeam. Please for which reason i cant colorize that second one and fourth one? Thank you for your answear back to me.
PS: I have been trying that approach you hinted me last time but it doesnt work for me
PS: I have been trying that approach you hinted me last time but it doesnt work for me
- BrynnS-approach.png (30.74 KiB) Viewed 1893 times
Re: FLAT SUN SPOKE EFFECT
Probably you didn't close every sunbeam. See my screenshot, where I've separated each sunbeam to show how they are all separate, closed paths.
My best guess is that probably you only closed the first, third, fifth, etc. So that's why the others won't take a fill color. If you followed my instructions, the paths that you need are probably still there. It's just that they are underneath the ones with fill color.
Let's see.... Ok, try this.
-- go around and add color to all the sunbeams that will have color
-- select them all at once with Selection tool, but don't drag a selection box around them - instead, hold the shift key, and click once on each one
-- click this button on the control bar It will move all those colored sunbeams to the bottom, and make it easier to select the paths for those that didn't get closed yet.
-- to help you see which path is which, change the stroke color for the sunbeams which have color. Do you know how to do that? Change to something bright or ugly, so you won't get it confused with something else in your drawing. You can change it back later.
-- so now you will be looking for black paths, and they will be right on top of the paths (whatever color you decided to use)
-- now just follow the same steps as before, to close the rest of the sunbeams
If you get lost, I could try to make you a video, although I'm not very good at making videos. I'll be around all day today, and try to watch for your message.
My best guess is that probably you only closed the first, third, fifth, etc. So that's why the others won't take a fill color. If you followed my instructions, the paths that you need are probably still there. It's just that they are underneath the ones with fill color.
Let's see.... Ok, try this.
-- go around and add color to all the sunbeams that will have color
-- select them all at once with Selection tool, but don't drag a selection box around them - instead, hold the shift key, and click once on each one
-- click this button on the control bar
It will move all those colored sunbeams to the bottom, and make it easier to select the paths for those that didn't get closed yet.-- to help you see which path is which, change the stroke color for the sunbeams which have color. Do you know how to do that? Change to something bright or ugly, so you won't get it confused with something else in your drawing. You can change it back later.
-- so now you will be looking for black paths, and they will be right on top of the paths (whatever color you decided to use)
-- now just follow the same steps as before, to close the rest of the sunbeams
If you get lost, I could try to make you a video, although I'm not very good at making videos. I'll be around all day today, and try to watch for your message.
- Attachments
-
- rwb2.png (44.74 KiB) Viewed 1844 times
Basics - Help menu > Tutorials
Manual - Inkscape: Guide to a Vector Drawing Program
Inkscape Community - Inkscape FAQ - Gallery
Inkscape for Cutting Design
Manual - Inkscape: Guide to a Vector Drawing Program
Inkscape Community - Inkscape FAQ - Gallery
Inkscape for Cutting Design
Re: FLAT SUN SPOKE EFFECT
Hello Brynn,
firstly thank you for your first aid to me. It was great from you really.
So i did everhing as you told me. Really.
But it doesnt work.
I do all steps,
it starts drawing the sunbeams,
afterthat kombine them,
then duplicate them,
then i do selection box over that two sets of the sunbeams,
and do break apart,
etc etc ets.
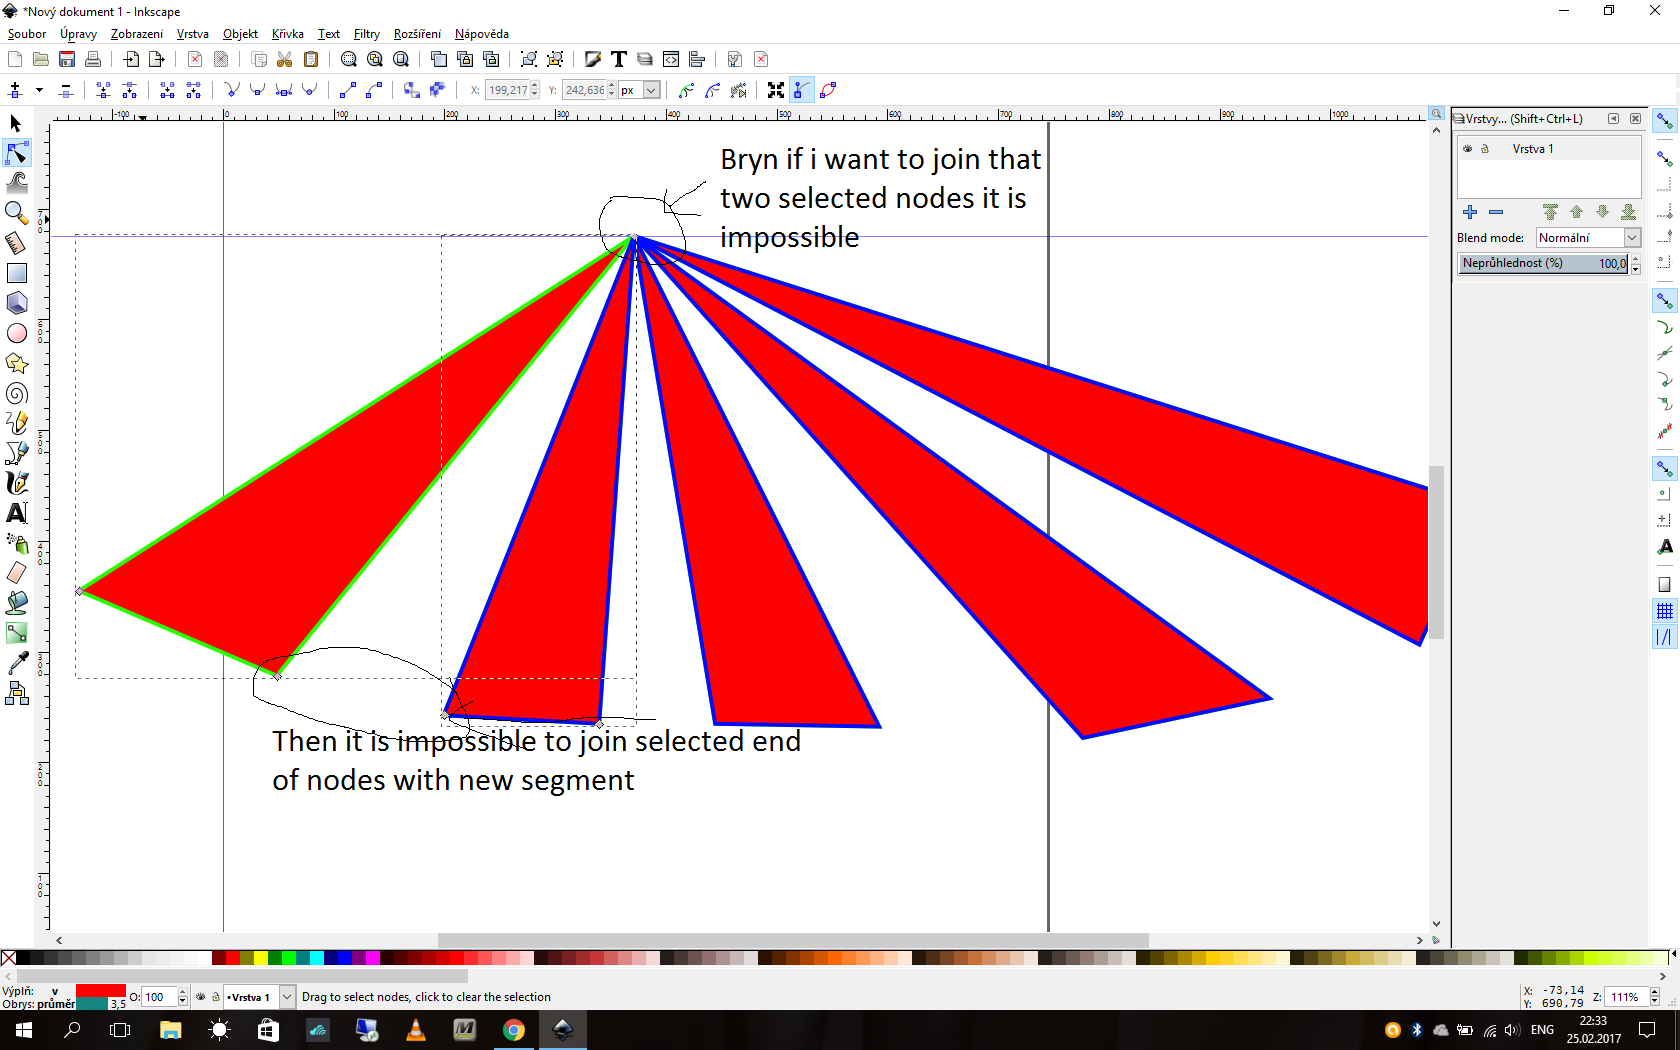
But when i want to do action: join selected nodes, i thing that 2 nodes which is touching each others, it is a problem because from this
place im getting that problem, because it couldnt be joined due it is not ends nodes. I looked around and there was information
about that using "join selected nodes" and thay said: is has to be end nodes in order to join them together.
Thank you brynn you are perfect.
firstly thank you for your first aid to me. It was great from you really.
So i did everhing as you told me. Really.
But it doesnt work.
I do all steps,
it starts drawing the sunbeams,
afterthat kombine them,
then duplicate them,
then i do selection box over that two sets of the sunbeams,
and do break apart,
etc etc ets.
But when i want to do action: join selected nodes, i thing that 2 nodes which is touching each others, it is a problem because from this
place im getting that problem, because it couldnt be joined due it is not ends nodes. I looked around and there was information
about that using "join selected nodes" and thay said: is has to be end nodes in order to join them together.
Thank you brynn you are perfect.
- Sunbeams-For-Brynn.png (203.3 KiB) Viewed 1828 times
Re: FLAT SUN SPOKE EFFECT
Ok. If they are not end nodes, that means they are already joined. So those are not the ones that you need to select. You've already closed those paths. All those ones with the red filling are finished.
The ones you need to select are hiding underneath (if everything went right before). The last instructions I gave would put the paths that you've already fixed down below. So that will make it easier to select, when the ones you want are on top.
Did you move all the red ones to the bottom?
Maybe something went wrong earlier, and those paths aren't hiding underneath after all. You can try this, to see if they are under there. Drag one of the nodes away a little bit. Drag one on the bottom, because it will be easier to see there. If you drag where they all come together at the top, it might be hard to see. Can you see a black path under the blue?
If they are not there, it's ok. We can still get where you want to be.
Basics - Help menu > Tutorials
Manual - Inkscape: Guide to a Vector Drawing Program
Inkscape Community - Inkscape FAQ - Gallery
Inkscape for Cutting Design
Manual - Inkscape: Guide to a Vector Drawing Program
Inkscape Community - Inkscape FAQ - Gallery
Inkscape for Cutting Design
Re: FLAT SUN SPOKE EFFECT
I have to log off now, but I should be back in the morning
Basics - Help menu > Tutorials
Manual - Inkscape: Guide to a Vector Drawing Program
Inkscape Community - Inkscape FAQ - Gallery
Inkscape for Cutting Design
Manual - Inkscape: Guide to a Vector Drawing Program
Inkscape Community - Inkscape FAQ - Gallery
Inkscape for Cutting Design