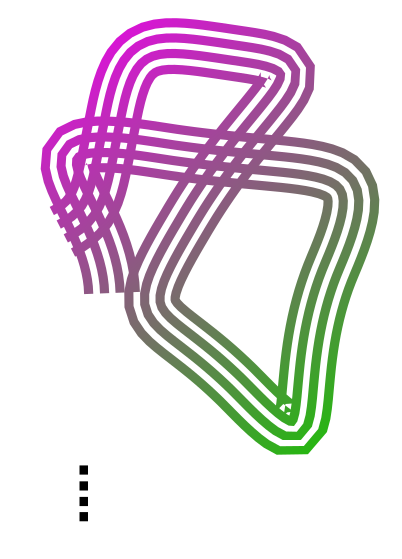
I have black stripes that follow a path in the image below (attached to message). I put a gradient on top of them. I want to take the area of overlap of the gradient and stripy path and pull it out and move it to the side. This moved object will be my black stripes, only with a gradient color.
How do I do this?
Applying a Gradient
Applying a Gradient
- Attachments
-

- Capture.PNG (162.86 KiB) Viewed 1420 times
Re: Applying a Gradient
In the original tutorial/original approach, the shape which on your image is filled with black, is built up from a series of black and white objects on top of each, therefore was its "blending" adjusted as a quick workaround.
In inkscape the only real alternative to that is using masking.
But, at this point you only have a path made with a pattern along, so changing the black fill to the gradient should be no problem through the fill and stroke panel (Shift+Ctrl+F).
(Technically it is still possible to add the same gradient fill even if they are overlapping though.)
On a side note, the overlapping of objects, playing with the z-ordering is kind of the most advanced part of 2D vector graphics in my humble opinion.
Yet can only point to this, in a somewhat similar vein.
Re: Applying a Gradient
I'm not sure how the stripes are made there. But you could just apply the gradient directly to the stripes, and not have to "cut the stripes out of the rectangle (gradient)". Might need an intermediate step or 2, depending how the stripes are made, such as Object to Path and Combine.
Basics - Help menu > Tutorials
Manual - Inkscape: Guide to a Vector Drawing Program
Inkscape Community - Inkscape FAQ - Gallery
Inkscape for Cutting Design
Manual - Inkscape: Guide to a Vector Drawing Program
Inkscape Community - Inkscape FAQ - Gallery
Inkscape for Cutting Design
Re: Applying a Gradient
I reproduced something similar as follows:
- make a path with
- for the pattern: draw a small rectangle (fill=black, stroke=none), duplicate it 3 times, align and distribute the four rectangles vertically (Ctrl-Shift-A), then group them (Ctrl-G)
- select both the pattern (group of rectangles) and the path.
- Extensions -> Generate from path -> Pattern along path. Set "copies of the pattern" to repeated, leave other settings default (deformation type = snake, three next values = 0, "pattern is vertical" unchecked, "duplicate before transformation" checked"). Check the "live preview" box and, if result as desired, "Apply" and "Close".
- optional: select the original path and delete it
- select the resulting ribbon form, go to Fill & Stroke (Ctrl+Shift+F), for Fill select a linear gradient, then click on (in toolbox) and tweak colors, direction etc.
Is this an answer to the question?
- make a path with

- for the pattern: draw a small rectangle
 (fill=black, stroke=none), duplicate it 3 times, align and distribute the four rectangles vertically (Ctrl-Shift-A), then group them (Ctrl-G)
- select both the pattern (group of rectangles) and the path.
- Extensions -> Generate from path -> Pattern along path. Set "copies of the pattern" to repeated, leave other settings default (deformation type = snake, three next values = 0, "pattern is vertical" unchecked, "duplicate before transformation" checked"). Check the "live preview" box and, if result as desired, "Apply" and "Close".
- optional: select the original path and delete it
- select the resulting ribbon form, go to Fill & Stroke (Ctrl+Shift+F), for Fill select a linear gradient, then click on
 (in toolbox) and tweak colors, direction etc.
Is this an answer to the question?
Portfolio bartovan.com
Tumblr / Instagram / Pinterest / Facebook / Twitter / OpenClipArt
Shop at Society6 / RedBubble
Using latest stable Inkscape on Ubuntu (current stable release) and Win 7.
Tumblr / Instagram / Pinterest / Facebook / Twitter / OpenClipArt
Shop at Society6 / RedBubble
Using latest stable Inkscape on Ubuntu (current stable release) and Win 7.
 This is a read-only archive of the inkscapeforum.com site. You can search for info here or post new questions and comments at
