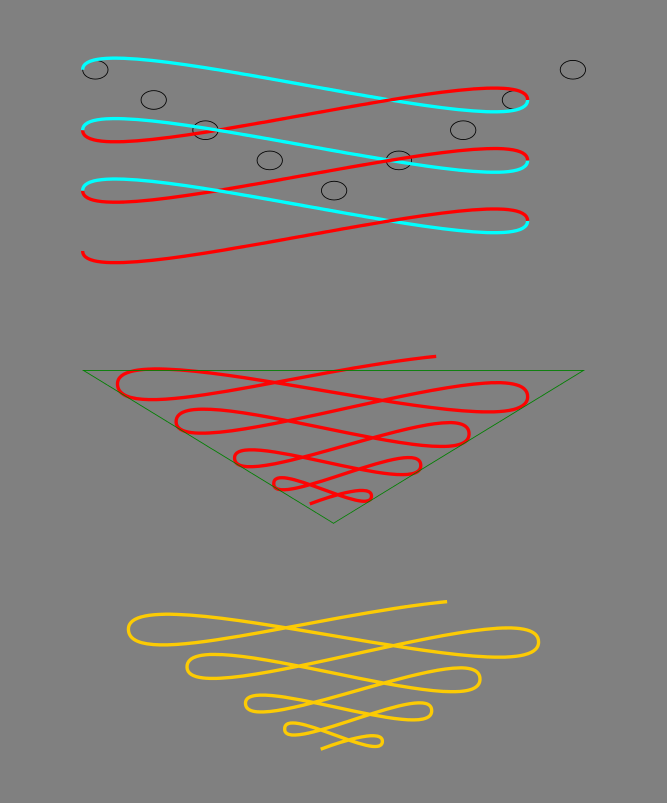
I made this (yellow) ornament for a texteffect on my blog.
Tried it freehand at first but i could see there is a pattern in the symmetry, so i ended up constructing a complicated technique, which consists of duplicating and flipping this reversed letter S shape and adding it up to a loop.
In the next phase i scaled individual loops down with the help of the triangle and finally adjusted all the nodes to get nice curves.
Im sure there is an easier, quicker way of doing it, but i dont know how....
Any ideas ?
curved Ornament
-
Espermaschine

- Posts: 892
- Joined: Thu Jun 05, 2014 9:10 pm
-
Espermaschine
- Posts: 892
- Joined: Thu Jun 05, 2014 9:10 pm
Re: curved Ornament
Sorry for the double post. Came up with another technique, which still isnt perfect.
- Attachments
-
- Autosmooth.png (45.95 KiB) Viewed 2396 times
Re: curved Ornament
Maybe there is a way to use paramteric curves for that.
∞, the shape of a lemniscate can be a good starting point.
∞, the shape of a lemniscate can be a good starting point.
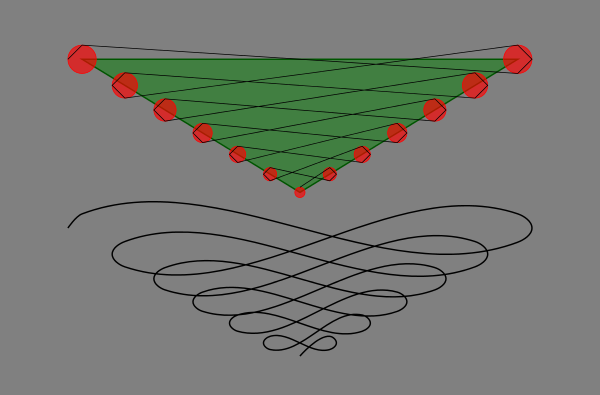
Re: curved Ornament
Not an exact match, would need adding more scale for y, but quite good for a start:

for the actual functions, have a look at the original:
https://openclipart.org/detail/222309/ornament
for the actual functions, have a look at the original:
https://openclipart.org/detail/222309/ornament
-
Espermaschine
- Posts: 892
- Joined: Thu Jun 05, 2014 9:10 pm
Re: curved Ornament
Lazur URH wrote:Maybe there is a way to use paramteric curves for that.
*cries*
Thanks for the example !
I wonder if there is another way how to get the effect manually though.
It seems to me the trick is to get the distance of the circles created to help with drawing the path into another ratio (not sure what the correct term is....exponential maybe ?)...
Re: curved Ornament
That looks quite good approach for a manual construction.
To alter the distances you can use the interpolate extension, where you can set the exponent.
But I would try it in a linear way first.
By combining the largest and smallest circles together, adding an interpolate subpaths lpe,
and setting 13 steps, then using it as a base for both sides -the two sides should have a half phase shift.
Thinking it over, for simple repeats you can try to use tiled clones or iterate scaling with the transformation panel on duplicants.
-
Espermaschine
- Posts: 892
- Joined: Thu Jun 05, 2014 9:10 pm
Re: curved Ornament
Lazur URH wrote:That looks quite good approach for a manual construction.
This doesnt give me the exact effect i want, because the loops overlap.
At the moment the space between the circles are equidistant, but what i think is needed is smaller space for the small circles growing to bigger space for the bigger circles, if that makes sense.
Is there a way to distribute the circles on the path, so the space increases each time ?

Re: curved Ornament
Espermaschine wrote:Is there a way to distribute the circles on the path, so the space increases each time ?
You could use tiled clones, with the shift and scale tabs, to set a spacing that increases whilst the clone size also increases. That actually gets you a horizontal or vertical row, so there's more work needed to get everything into the right positions, but it does at least give you some reproducibility, with parameters that you can tweak to get precisely the effect you want.
-
Espermaschine
- Posts: 892
- Joined: Thu Jun 05, 2014 9:10 pm
Re: curved Ornament
Xav wrote:Espermaschine wrote:Is there a way to distribute the circles on the path, so the space increases each time ?
You could use tiled clones, with the shift and scale tabs, to set a spacing that increases whilst the clone size also increases. That actually gets you a horizontal or vertical row, so there's more work needed to get everything into the right positions, but it does at least give you some reproducibility, with parameters that you can tweak to get precisely the effect you want.
I played around with tiled clones but i find it very hard to get good results. Its kind of the same problem as in here
Can you provide us with an example ? That would be very helpful !
Heres what i had in mind:
the space between the circles increases just as the circles grow, just in an inverted way, so to speak.
So i interpolated 6 Sub-Paths (LPE) for the circles and another 6 rectangles with the same height as each circle has as a diameter.
Then i extracted the negative space of the rectangles and used them in reverse order as placeholders for the space between the circles and constructed the path as in my previous examples.
- Attachments
-
- curved Space.svg
- (27.75 KiB) Downloaded 161 times
Re: curved Ornament
By drawing one loop that looks fine and resizing it each time/using tiled clones you can draw it easier.
Made this by duplicating, and resizing each duplicant by 85%.
Made this by duplicating, and resizing each duplicant by 85%.
Re: curved Ornament
Espermaschine wrote:Xav wrote:Espermaschine wrote:Is there a way to distribute the circles on the path, so the space increases each time ?
You could use tiled clones, with the shift and scale tabs, to set a spacing that increases whilst the clone size also increases. That actually gets you a horizontal or vertical row, so there's more work needed to get everything into the right positions, but it does at least give you some reproducibility, with parameters that you can tweak to get precisely the effect you want.
I played around with tiled clones but i find it very hard to get good results. Its kind of the same problem as in here
Can you provide us with an example ? That would be very helpful !
I don't have an example, I'm afraid, I was just responding to the question of "is there a way to distribute... so the space increases each time".
The big problem with tiled clones is that the calculations are all relative to the object's bounding box size, with no mechanism to use absolute pixel values (or other units) for any of the parameters. This makes it particularly difficult to get the kind of precise positioning that it sounds like you want.
Re: curved Ornament
Lazur URH wrote:Not an exact match, would need adding more scale for y, but quite good for a start
Turns out that this pattern and this one are complete opposites in the means of the base y functions -vertical movements-.
Couldn't let it go, here is something closer to the original:

The actual functions are presented in this file.
-
Espermaschine
- Posts: 892
- Joined: Thu Jun 05, 2014 9:10 pm