Need help in creating a shape
Need help in creating a shape
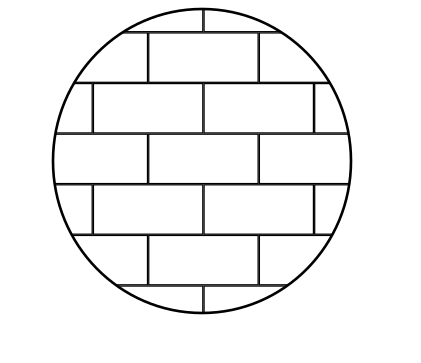
Hi, is there any way i can create such drawing with any tool or extension? Please help 
Re: Need help in creating a shape
Is your question related to "any key" or you had something else on mind?
Re: Need help in creating a shape
Here are the tools that I think would be best for a newbie:
Ellipse (Circle) tool
Rectangle tool
Snapping (not really a tool, but a feature or function -- info in the manual: Basics - Help menu > Tutorials
Manual - Inkscape: Guide to a Vector Drawing Program
Inkscape Community - Inkscape FAQ - Gallery
Inkscape for Cutting Design
Ellipse (Circle) tool

Rectangle tool

Snapping (not really a tool, but a feature or function -- info in the manual: Basics - Help menu > Tutorials
Manual - Inkscape: Guide to a Vector Drawing Program
Inkscape Community - Inkscape FAQ - Gallery
Inkscape for Cutting Design
Re: Need help in creating a shape
Mrs. Hudson, is that you?
Re: Need help in creating a shape
brynn wrote:Here are the tools that I think would be best for a newbie:
Ellipse (Circle) tool
Rectangle tool
Snapping (not really a tool, but a feature or function -- info in the manual: Top
Re: Need help in creating a shape
As Brynn suggested, there are various ways to approach this, depending on how you want to use the finished result.
If all you need is the visual effect, I would probably build the wall using the tool, using snapping or the Align & Distribute dialog to keep it neat. Then I would group the separate bricks to give you a single object. Finally, draw a circle and clone it; use the clone as a clipping path for the wall, and the original circle to provide the visible outline. By using a clone, any changes to the size or shape of the visible outline will automatically be reflected in the clipped area.
I've attached a file based on this approach.
If you need further information about any of the individual tools or techniques I've described above, I've covered all of them in my tutorial series: viewtopic.php?f=6&t=11981
In particular you might need to look at parts 13 (clipping), 28 (clones) and 32 (using clones for clipping).
If all you need is the visual effect, I would probably build the wall using the
 tool, using snapping or the Align & Distribute dialog to keep it neat. Then I would group the separate bricks to give you a single object. Finally, draw a circle and clone it; use the clone as a clipping path for the wall, and the original circle to provide the visible outline. By using a clone, any changes to the size or shape of the visible outline will automatically be reflected in the clipped area.
I've attached a file based on this approach.
If you need further information about any of the individual tools or techniques I've described above, I've covered all of them in my tutorial series: viewtopic.php?f=6&t=11981
In particular you might need to look at parts 13 (clipping), 28 (clones) and 32 (using clones for clipping).
Re: Need help in creating a shape
there is an alternative to the clone and clipping path system that Xav gave you (other methods are not really worth pursuing).
You can create a pattern, which is not as straightforward but can be reused over and over easily.
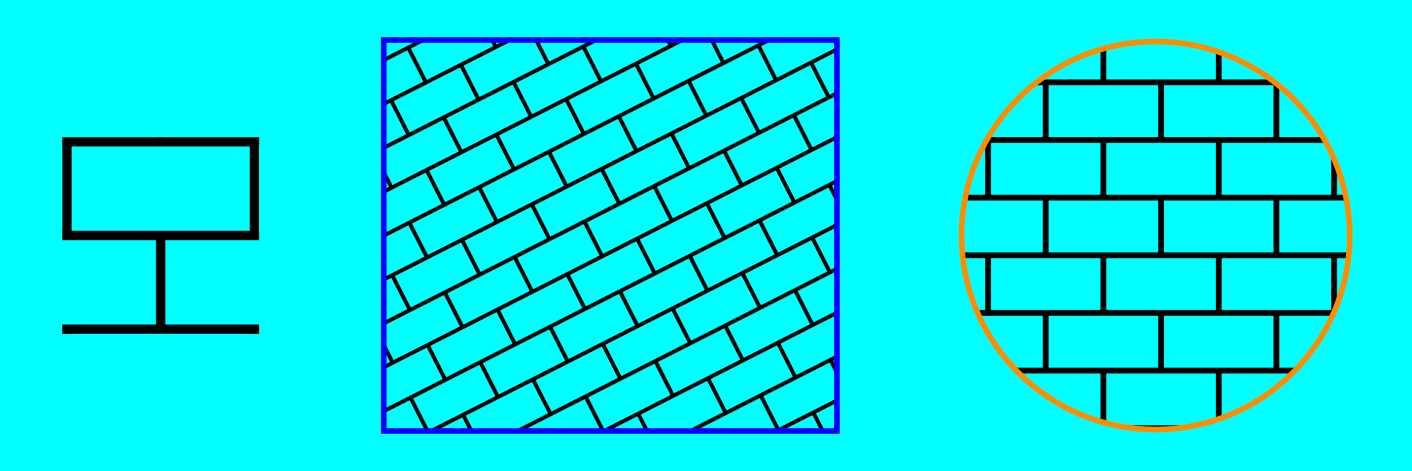
I have attached a file showing the pattern basis and using it in two objects with scaling and rotation.
Making a pattern is simple: select the objects you want to be the pattern, and from the object menu select patterns>objects to pattern. Then, in the fill and stroke dialog box, choose pattern as the fill style and your newly created pattern should be the default first choice, or, you can pick from the dropdown list.
There is one thing that makes this method less than immediate and that is the often necessary editing of the definition in the XML editor to allow overlap. This takes care of any white-line seams (a recurring problem with all pattern fills) or thick lines (specific to grid fills like this one) and is just a matter of changing two numbers that specify the width and height of the pattern.
Edited: simpler pattern
- Attachments
-
- patfill.svg
- (6.85 KiB) Downloaded 168 times
Your mind is what you think it is.
 This is a read-only archive of the inkscapeforum.com site. You can search for info here or post new questions and comments at


