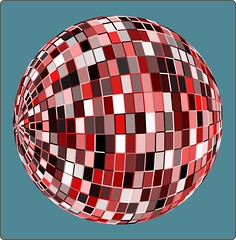
Part I: Making a ball
1. Draw a square and set the stroke to 1 and the dimensions to 501x501.
2. With the square selected do Effects>Render>Grid with line width 1, horizontal spacing 25 and vertical spacing 25, offsets at zero.
3. Draw an ellipse and set the stroke to 1 and the dimensions to 500x500. Then convert the ellipse to a path.
4. Select the ellipse and the grid and center them on your page.
5. Select the grid, then select the ellipse (this order is important) then do Effects>Modify Path>Bezier Envelope.
6. Select your now-warped grid and your ellipse (you may have to re-center them), then do Path>Combine.
Part II: Breaking the ball into component pieces
Next we need to make all the little warped grid areas into individual paths. This is trickier than expected but totally do-able.
7. With your path selected do Path>Stroke to path.
8. With your path selected do Path>Break apart.
9. With all the paths you just made selected, change the fill to white and the stroke to black and set the stroke to 1.
10. With all the paths selected do Effects>Color>Randomize. Check all of Hue, Saturation, and Lightness. [Side note: if you want a slightly simpler disco ball you can set the fill to unfilled in step 9 and then do this effect and be done. Also, you may want to use a pre-set color palette for this. I don't work with palettes much because I'm a dilettante, but I imagine they would be helpful in this case.]
Part III: Making it purty
This is the step for artists, so if my rendering isn't up to snuff (and it's probably not) it's because I'm supposed to be studying electromyography instead of this.
11. Draw another ellipse and set the stroke to 1 and make it 500x500. Duplicate the ellipse.
12. Select one ellipse and do a radial gradient fill. My gradient has four stops -- white, cyan, yellow, magenta.
13. Select all your mirror ball paths and do Object>Group.
14. Select your group of mirror ball paths and your gradient ellipse and align their centers.
15. Select the gradient ellipse alone and set the opacity to around 70% and the blur to 2.0.
16. Select the gradient ellipse and the group of mirror ball paths and do Object>Group.
17. Select your group and your other ellipse from step 11 and align their centers. Then do Object>Clip (you'll have to make sure your ellipse is the topmost object).
18. With the polygon tool draw your favorite lens flare star shape. I did a four sided star and a smaller six sided star and converted to paths and then unioned them. Once you have a flare shape you like set the stroke to none and then for the fill do a radial gradient of white to transparent. You can try fancy lighting effects with the fill if you like. Position the flare on the ball to your liking and add some blur and transparency. Duplicate and resize to add other flares.
19. Finally, create a glow around the ball and some reflections on the background. I know there's a way to make Edit>Clone>Tiled Clones magic up some random reflections but I've never managed to tame the beast that is Tiled Clones. If anyone can give a few tips I'd love to hear them. The glow is just another ellipse, slightly larger than 500x500 with a radial gradient of white to black and a sizeable blur. The reflections are just ellipses skewed with rotation and radial fill from color to black and a blur. This is the step where Illustrator's fisheye warp effect is hard to duplicate in Inkscape. Anyway, that's it. Disco lives, baby!

http://files.myopera.com/llogg/files/discoballtutorial.svg
P.S. I'm not sure if anyone can tell after that tutorial what I meant by this technique in Inkscape being less intuitive but more straight-forward. In Illustrator you would think "I need this mirror texture applied to a sphere," and use a complex function of Illustrator to do just that. In Inkscape you have to think in terms of the individual shapes on the sphere to get the effect. So while Illustrator's complex function is more intuitive it's harder to understand what it's doing because the software does it behind the scenes. Inkscape allows more hands on control at each step in creating your final image.


