gotcha

Author Topic: Advice on how to create a baseball and add 160+ names to it.  (Read 3822 times)

March 13, 2018, 04:50:55 PM
Read 3822 times

Bubbles02

  • Jr. Member

  • Offline
  • ***

  • 10
Hello,

I am new to Inkscape (just downloaded it a few days ago) and I tried to create a baseball with no luck, lol (tried to follow a written tutorial but I couldn't find out where I could size the eclipse and the rest of the tutorial).
I am trying to create a baseball that has about 160+ names in it or make a baseball out of the roughly 160+
names.
Can someone explain to me on how to make this happen? I need that for a T-shirt I am creating for a fundraiser.

Thank you for your help.

Bubbles02
  • 0.92
  • Windows 8.1

March 13, 2018, 05:35:39 PM
Reply #1

brynn

  • Administrator

  • Offline
  • ******

  • 3,941
  • Gender
    Female

    Female
    • Inkscape Community
Welcome to the forum!

Wow!  Can 160 names even fit on a baseball?  In reality, I guess you'd have tell the people signing it, not to make letters taller than 3 mm, or something like that.  Well I guess theoretically, the image would only contain about 80 names.  But still....

Or do you mean the 80 names are printed on the ball?

Can you give us a link to the tutorial?

The hardest part will be deforming all the names to appear to be mapped to the sphere.  But first, I need to make sure I understand you correctly.
  • Inkscape version 0.92.3
  • Windows 7 Pro, 64-bit
Inkscape Tutorials (and manuals)                      Inkscape Community Gallery                        Inkscape for Cutting Design                     


"Be ashamed to die until you have won some victory for humanity" - Horace Mann                       

March 14, 2018, 11:51:43 AM
Reply #2

Moini

  • IC Mentor

  • Offline
  • ******

  • 1,568
    • VektorRascheln
If you want to fill the shape with the text (like this: http://write.flossmanuals.net/start-with-inkscape/flowing-text-into-a-frame/):

- create a baseball silhouette
- then type out all the names
- then select both text and silhouette
- go to Text > Flow into Frame
- then adjust the font size until there no longer is a red frame around the text and all names are visible.

March 14, 2018, 04:38:17 PM
Reply #3

Bubbles02

  • Jr. Member

  • Offline
  • ***

  • 10
Thanks for your reply. This is the written tutorial I tried to use https://inkscapesportschool.wordpress.com/baseball/
It is only the first names that will be used and sometimes the initial of the last name.
I can make the baseball as big/small, as long as it fits on the back of a tshirt and the names are legible.
Or do you know a way that I could shape all the names into the shape of a baseball.

I have attached a image of a shirt with a outline of a butterfly and names in it. I want to do something similar to this but the shape is a baseball.

Welcome to the forum!

Wow!  Can 160 names even fit on a baseball?  In reality, I guess you'd have tell the people signing it, not to make letters taller than 3 mm, or something like that.  Well I guess theoretically, the image would only contain about 80 names.  But still....

Or do you mean the 80 names are printed on the ball?

Can you give us a link to the tutorial?

The hardest part will be deforming all the names to appear to be mapped to the sphere.  But first, I need to make sure I understand you correctly.
  • 0.92
  • Windows 8.1

March 15, 2018, 11:45:35 AM
Reply #4

Moini

  • IC Mentor

  • Offline
  • ******

  • 1,568
    • VektorRascheln
That's exactly what the steps I wrote down will do :D

Can you try them out and let us know where you get stuck?

March 16, 2018, 04:15:10 AM
Reply #5

brynn

  • Administrator

  • Offline
  • ******

  • 3,941
  • Gender
    Female

    Female
    • Inkscape Community
Just to clarify, the steps Moini provided, will make the names look flat, like in a 2D plane, like they are in the butterfly. 

But if you want the names to look like they are wrapped around the sphere and have a 3D appearance -- like for example, a name on the side of the ball will be taller on the side nearest the middle of the ball, and shorter towards the edge.  If you want that kind of effect, Inkscape is probably not the best tool.

With a lot of time and fidgetting (perhaps using Perspective extension or possibly Envelope Deformation (either extension or LPE)), you could probably fake it.  But if you want to look realistic, you'll need to make the ball and the names in Inkscape, and then take it to another program, to deform the text to look like it's wrapped around the sphere.  It seems like I heard that GIMP will do that, but I don't know for sure.

When I first read your message, I thought you wanted to make it look like the names have been signed on the baseball.  You know, like when the whole baseball team will sign the ball (or a bunch of them) and then sell them to benefit charities, or like for collectors.
  • Inkscape version 0.92.3
  • Windows 7 Pro, 64-bit
Inkscape Tutorials (and manuals)                      Inkscape Community Gallery                        Inkscape for Cutting Design                     


"Be ashamed to die until you have won some victory for humanity" - Horace Mann                       

March 17, 2018, 06:04:22 PM
Reply #6

Bubbles02

  • Jr. Member

  • Offline
  • ***

  • 10
Ok. I tried my best but the names are either not all of them on it or all fit on it, but a huge gap between the last name and the bottom of the ball.

Also is there away to make the names shape to the curves of the "seam" of the ball?

Attached is my attempt.  :(
  • 0.92
  • Windows 8.1

March 17, 2018, 06:41:41 PM
Reply #7

Moini

  • IC Mentor

  • Offline
  • ******

  • 1,568
    • VektorRascheln
1. Close the paths so they can entirely be filled - i.e. your baseball consists of 5 areas. Make the areas where you want to have the text in have an outline all around the border of the area.
2. Modify the font size to fit the whole text (as suggested above).
3. If I may, I'd suggest using a different font.

With this you can fill the shapes completely, but the text will not be curved.

To fill the separate shapes in a specific order, use Path -> Break apart to turn them into separate objects, then select them in reverse order.

If you want curved, non-deformed text, look into the 'Text along Path' functionality and draw the paths the text should follow, or better, create them with the Interpolate path effect, to be more flexible in the number of lines.

If you can live with deformed text, look into the envelope LPE.

None of these will give you a realistic 3D appearance. Use either a raster graphics editor like gimp to do projection on a sphere, or use a 3D graphics program like Blender.

March 17, 2018, 08:59:38 PM
Reply #8

brynn

  • Administrator

  • Offline
  • ******

  • 3,941
  • Gender
    Female

    Female
    • Inkscape Community
If you need help with learning how to close the paths, and you can provide your SVG file, I'll use it to show you how.

Out of curiosity, how close are you to to 160 names?  It looks like everything up til and including "S" fits now, plus a couple of Ts.

I don't know if this would be acceptable.  But what if you just filled a circle with the names, and then overlay the curved stitching area on top -- maybe with some transparency, so the names can still be seen underneath?  Well, just a thought :)
  • Inkscape version 0.92.3
  • Windows 7 Pro, 64-bit
Inkscape Tutorials (and manuals)                      Inkscape Community Gallery                        Inkscape for Cutting Design                     


"Be ashamed to die until you have won some victory for humanity" - Horace Mann                       

March 18, 2018, 11:55:41 AM
Reply #9

Bubbles02

  • Jr. Member

  • Offline
  • ***

  • 10
I had changed the font size and all of the names fit on it but it left a gap on the bottom of the ball. I also changed font style to see what looked better. Any suggestions on font style I should use? Either the font is too big or too small.
I'll will give the suggestions a try tonight or during the week when I get a chance to mess with my project.
Thanks for helping me.
  • 0.92
  • Windows 8.1

March 18, 2018, 02:08:20 PM
Reply #10

Moini

  • IC Mentor

  • Offline
  • ******

  • 1,568
    • VektorRascheln
Just a hint that may come in handy later: Font sizes do not need to be integer numbers, you can also add a decimal dot, and make them float numbers.
E.g. if 12 is too small, and 13 is too large, make it 12.5 .

March 23, 2018, 04:55:40 PM
Reply #11

Bubbles02

  • Jr. Member

  • Offline
  • ***

  • 10
If you need help with learning how to close the paths, and you can provide your SVG file, I'll use it to show you how.

Out of curiosity, how close are you to to 160 names?  It looks like everything up til and including "S" fits now, plus a couple of Ts.

I don't know if this would be acceptable.  But what if you just filled a circle with the names, and then overlay the curved stitching area on top -- maybe with some transparency, so the names can still be seen underneath?  Well, just a thought :)

I have not messed with my project since I wrote last on this board. I have attached the file for you, if you want to show me how to do the suggested.

Thank you
  • 0.92
  • Windows 8.1

March 24, 2018, 12:41:59 PM
Reply #12

brynn

  • Administrator

  • Offline
  • ******

  • 3,941
  • Gender
    Female

    Female
    • Inkscape Community
  1 -- Move the text out of the way for now.
  2 -- Select the ball
  3 -- Path menu > Break Apart (makes all the paths separate)

Somehow, the circle has become broken.  Notice the bottom-left node area there's a tiny open space there.  So let's put that back together.

  4 -- With the Node tool, select the circle.  Drag a little selection box around both those nodes
  5 -- Click Join Selected Nodes button, on the control bar (looks like this  :jsn: )

As far as I understand, you want the text in the 3 large sections, and not where the stitching goes.  So I'm going to continue with that goal.

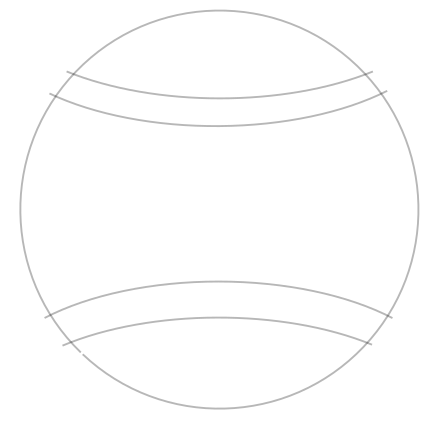
  6 -- Select the 4 curved paths which make the stitching area, with the Selection tool  :sel:
  7 -- Hold the Shift and Ctrl keys down, while you drag one of the corner arrows outward, just a tiny bit.  We need to make them slightly larger than the ball
  8 -- While they're still selected, Object menu > Raise to Top

Here's what it looks like now
b1.png
*b1.png
(16.05 kB . 438x425)
(viewed 336 times)


  9 -- Create a new layer, by Layers menu > Add Layer.  Give the new layer any name you want.
10 -- Using the Selection tool, drag a selection box around the circle and 4 curved paths
11 -- Duplicate
12 -- While everything is still selected, hold the Shift key while you click on some other color besides black.  This will make the duplicates a different color, and help you not to be confused (because this will be a confusing process).
12 -- While those are still selected, hold Shift while you press Page Up key once.  (This moves everything up to the new layer.)
13 -- You can either use the layer indicator in the status bar, or you can open Layers menu > Layers.  But either way, click the tiny eye icon beside the new layer.  This will hide that new layer and all its contents.  Since you made the duplicates a different color, you can hide and unhide the 2 layers, to confirm that all the original black objects are in one layer, and the other colored objects are in the other layer.

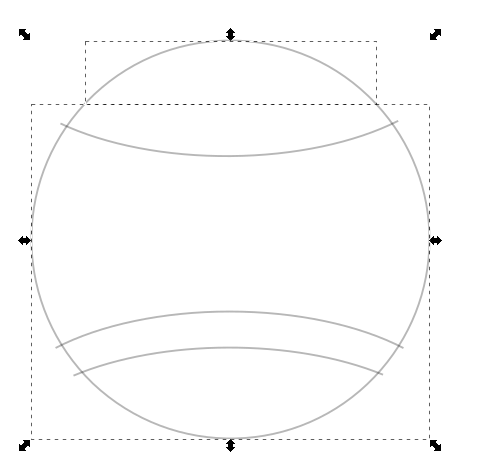
14 -- In the original layer with the black paths, select the circle, hold Shift and select the top curved path
15 -- Path menu > Cut Path

The curved path will disappear.  But that's ok, because we saved duplicates in the hidden layer.  Here's how it will look, right after step #15.
b3.png
*b3.png
(16.49 kB . 477x468)
(viewed 363 times)


Notice how there's a bounding box around the top section of the circle.  (The bounding boxes are the dashed rectangles.)  And a larger bounding box around the rest of the circle.  That indicates they are in 2 separate pieces.

16 -- Select the bottom section of the circle, hold Shift while you select the top curved path
17 -- Path menu > Cut Path

Now you have this.

b4.png
*b4.png
(14.75 kB . 463x453)
(viewed 334 times)


Notice the 2 tiny bounding boxes at the top.

18 -- Deselect everything, then select the 2 tiny pieces and delete them
19 -- Now try and repeat that process with the bottom 2 curved paths, and delete the tiny sections

When you finish, you should have this

b5.png
*b5.png
(9.83 kB . 431x423)
(viewed 318 times)


17 -- Hide that layer, and unhide the other layer
18 -- Select the 4 curved paths, and do Object menu > Lower to Bottom
19 -- Duplicate the circle
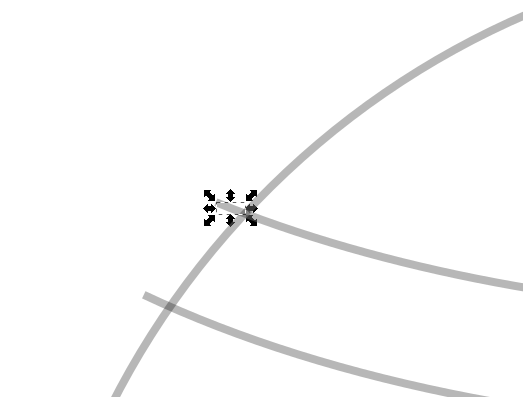
20 -- While circle is still selected, hold Shift and select the top curved path
21 -- Path menu > Cut Path

Even though that's the same command we used on the other layer, this time, we had the curved paths on the bottom and circle on top (opposite of before).  So what this did was use the circle to trim off the curved paths in precisely the right place.  Now you should see this:
b2.png
*b2.png
(11.81 kB . 523x397)
(viewed 331 times)


22 -- Delete the 2 tiny segments on the left and right sides
23 -- Repeat steps #19 through #22 for the other 3 curved paths

24 -- Select the 4 curved paths
25 -- Hold Shift while you press Page Down once (moves the 4 paths back down to the original layer

26 -- Hide this layer (which now should only have a circle in it), and unhide the layer below (the original layer)

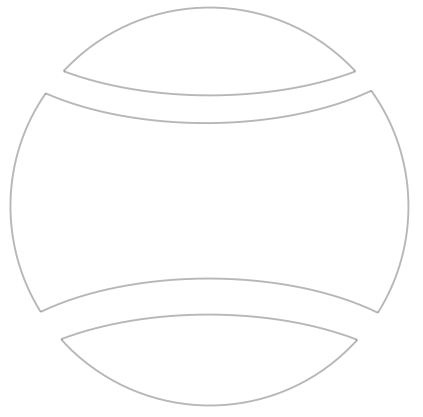
Now, you finally have all the pieces you need, to put the 3 sections of the ball together.  Here's what you should see:
b6.png
*b6.png
(15 kB . 423x417)
(viewed 354 times)


It looks perfect.  But actually, it's all separate paths.  They still need to be connected.

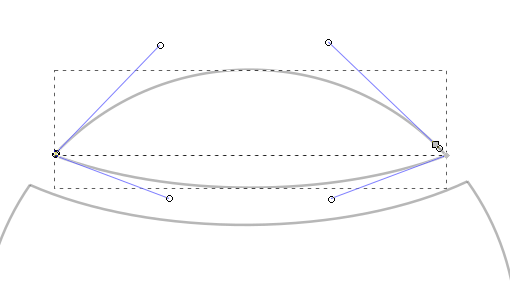
  1 -- Using the Node tool  :node:  select the top section of the circle, and the top curved path
  2 -- Drag a tiny selection box around the 2 nodes (which are right on top of each other) on the left side

Looks like this
b7.png
*b7.png
(13.19 kB . 510x283)
(viewed 354 times)


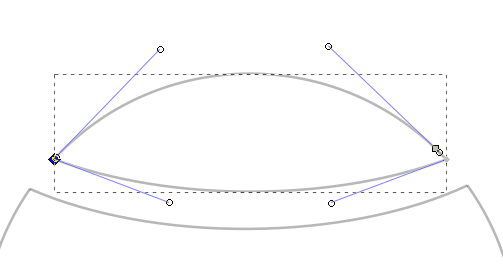
  3 -- Click Join Selected Nodes button on the control bar

Looks like this
b8.png
*b8.png
(12.87 kB . 503x266)
(viewed 344 times)


  4 -- Repeat for the right side
  5 -- The bottom section of the circle will work just like the top one, meaning that you'll need to join nodes on the left and on the right.
  6 -- For the middle section, you'll need to join nodes in 4 places, top left and right, and bottom left and right.

Now with all the nodes joined, you are ready to put the text inside each section.  I'm guessing you'll need to divide the text up, so that it fits properly.  Remember that you can adjust the size and font, to make it fit right.

Earlier, you had mentioned possibly making the text go in curved lines, like the stitches.  That is possible to do, but I think you might have been asking that, so that the corners would get filled in.  I think having these sections will allow the corners to get filled in.  But if you still want to try curved lines, you can look into a feature called Text on Path.  You would draw curved paths and apply the text to the paths.  But you could only do it one path at a time.  So a good deal more work.  But it is possible.

Let us know how everything goes.  Let me know if you get stuck with my instructions.  It's a long and confusing process, so I might not have covered every little detail, or I might not have explained everything in the best way.  But just let me know if you get stuck.

Edit
I forgot about the circle left over in the extra layer.  If you don't want the row of stitches open on the ends, then just unhide that layer, and that extra circle will cover up the open ends.

Also, I noticed that all your original paths are partially transparent.  You'll probably want to make those fully opaque.  So when you're finished with everything, just Ctrl + A (select all) and whatever you did to make them transparent, do it the other way (if that makes sense).
  • Inkscape version 0.92.3
  • Windows 7 Pro, 64-bit
Inkscape Tutorials (and manuals)                      Inkscape Community Gallery                        Inkscape for Cutting Design                     


"Be ashamed to die until you have won some victory for humanity" - Horace Mann                       

March 24, 2018, 04:05:57 PM
Reply #13

Moini

  • IC Mentor

  • Offline
  • ******

  • 1,568
    • VektorRascheln
Wow, that's complicated.

I'd make three circles, give two of them a wide stroke, turn stroke to path, then move one circle up a bit and the other down a bit, union them, then do Path -> Difference with the first circle and tadaaaa.

March 24, 2018, 05:51:53 PM
Reply #14

Bubbles02

  • Jr. Member

  • Offline
  • ***

  • 10
@Brynn, thanks. I tried what you illustrated, but my text will not show up in the shape at all. I tried less names, changing opacity, but nothing seems to work :-(
  • 0.92
  • Windows 8.1

March 24, 2018, 06:11:58 PM
Reply #15

Bubbles02

  • Jr. Member

  • Offline
  • ***

  • 10
Wow, that's complicated.

I'd make three circles, give two of them a wide stroke, turn stroke to path, then move one circle up a bit and the other down a bit, union them, then do Path -> Difference with the first circle and tadaaaa.

I tried your way and if I want to get the text into the shape it will not go into it. It changes shape to a eclipse and is placed beside my baseball.
  • 0.92
  • Windows 8.1

March 24, 2018, 06:21:26 PM
Reply #16

Bubbles02

  • Jr. Member

  • Offline
  • ***

  • 10
I think I finally got it :-) What should I do with the open gap, which should be the seam? Any suggestions?
  • 0.92
  • Windows 8.1

March 24, 2018, 07:12:36 PM
Reply #17

brynn

  • Administrator

  • Offline
  • ******

  • 3,941
  • Gender
    Female

    Female
    • Inkscape Community
Moini, I was more concerned with showing Bubbles02 how to get from where he (or she) was, to where he (or she) wanted to be, rather than starting all over with a whole different procedure for drawing the ball.  Of course it would have been easier to draw the ball in a different way, but no one was asking that question or making that suggestion.

Bubbles02, that looks awesome!

I edited my message with a note about the open seams.  It's possible you saw the message before I edited it.  Anyway, there was a circle left over in the new layer.  Just unhide that layer, and that circle will be on top, and it will cover those gaps.

Well, not unless you used Moini's technique.  It actually doesn't look like the same ball, so I think you might have used her technique.  So she should answer about that.

Or you could go back to the original tutorial, and draw the red stitches?
  • Inkscape version 0.92.3
  • Windows 7 Pro, 64-bit
Inkscape Tutorials (and manuals)                      Inkscape Community Gallery                        Inkscape for Cutting Design                     


"Be ashamed to die until you have won some victory for humanity" - Horace Mann                       

March 25, 2018, 04:59:35 AM
Reply #18

Bubbles02

  • Jr. Member

  • Offline
  • ***

  • 10
@Brynn, I am a female :-) I did both versions last night. Not sure yet which one I will use for the shirt I am planning on making.

Edit: I redone the original baseball, with the version you explained. I had issue to edit my original one. Is there a way to have only one layer (whole baseball with no opening) after I inserted all the names?

I appreciate all the help from you 2 :-)
« Last Edit: March 25, 2018, 05:47:36 AM by Bubbles02, Reason: forgot to mention something »
  • 0.92
  • Windows 8.1

March 25, 2018, 06:32:40 AM
Reply #19

Moini

  • IC Mentor

  • Offline
  • ******

  • 1,568
    • VektorRascheln
You can just make the frame fully transparent (it's always possible to see it in the Object > Objects... dialog or in View > Display Mode > Outline mode), and then center a new circle around it that you can style as you like) - that is, if you don't need the additional internal lines. I think that might look better.

If you want to keep the internal lines, just add a circle - you can adjust its dimensions by copying the frame, then pasting the frames size onto the new circle (Edit -> Paste size -> Paste size). Then align it with the frame (Object > Align and distribute, select frame, select circle, relative to: first selected, align centers horizontally, align centers vertically). If its style is different from the one of the frame, copy the frame, then select the new circle, and paste the style by doing Ctrl+Shift+V.

March 25, 2018, 02:22:21 PM
Reply #20

Bubbles02

  • Jr. Member

  • Offline
  • ***

  • 10
Appreciate all the help.

Here is the possible look of the shirt I am going to get printed.
Tshirt back.JPG
*Tshirt back.JPG
(50.31 kB . 563x545)
(viewed 321 times)
  • 0.92
  • Windows 8.1

March 26, 2018, 12:00:30 AM
Reply #21

brynn

  • Administrator

  • Offline
  • ******

  • 3,941
  • Gender
    Female

    Female
    • Inkscape Community
  • Inkscape version 0.92.3
  • Windows 7 Pro, 64-bit
Inkscape Tutorials (and manuals)                      Inkscape Community Gallery                        Inkscape for Cutting Design                     


"Be ashamed to die until you have won some victory for humanity" - Horace Mann