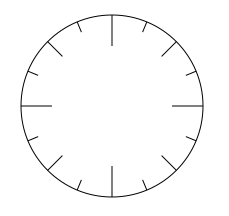
First I should note that there are at least a few ways to do this, and this is just how I would do it. Others will have different preferences and ideas.
1 -- Using the Pen

or Pencil

tool, draw a vertical line, which is the same length as the width of the circle. Holding the Ctrl key while you drag the mouse constrains it to vertical or horizontal (or 15° angle increments).
2 -- Duplicate (Edit menu, or this button,

, or the key shortcut, which can be looked up in Help menu > Key and Mouse Ref)
3 -- Object menu > Transform > Rotate, and enter 22.5°, then click Apply button
4 -- Repeat #2 and #3 until you have all 8 lines
At this point, you should have something like this:

 cr1.png
(6.17 kB . 211x207)
(viewed 248 times)5 -- Using the Selection tool, click on the vertical line, hold the Shift key, and click on the horizontal line. The Shift key allows for multiple selections.
6 -- Path menu > Combine
7 -- Select the NW/SE and NE/SW lines
8 -- Path menu > Combine
9 -- Select all the other 4 lines
10 -- Path menu > Combine
11 -- Using the Ellipse/Circle tool, draw a circle. You have to hold the Ctrl key, to make sure it's a true circle, and not an ellipse.
12 -- Switch to the Selection tool, and on the control bar, you can set the Width and Height to the same length of the lines
13 -- Set up Snapping. The Snap control bar is usually on the right side of the Inkscape window. Set it up like in this screenshot:

 snap-basic.png
(5.32 kB . 30x583)
(viewed 238 times)With snapping set up, you can drag the circle (with Selection tool) over to the lines, and it will snap into place. It sort of jumps off the mouse, when it gets close to something. You might have to try a couple of times to make it snap in the right way. For example, it might try to snap so that the lines are beside the circle, instead of inside it. But it's not hard to do.
14 -- Duplicate the circle
15 -- With the Selection tool, and while you're holding both the Shift and Ctrl keys, grab one of the arrows that you see around the circle, and drag inward. You can see that this allows you to scale the circle. If you just want to approximate the length for the tic marks, just stop dragging when the distance between the outer circle and the inner circle is the length you want for the tic marks.
However, if you want the tic marks to be some specific length, you'll need to use the Selection tool control bar, and set the size of the circle so that the difference between the width of the inner and outer circles is the length of the tic marks. Then you'll have to give the circle a temporary color (click on some color in the palette). I don't know why this is necessary, but the circle has to have a fill color, so that snapping to the rotation center can happen. When you snap the circle into place, watch for the snap indicator to tell you that you've snapped rotation center to rotation center. After you see that snap indicator, you can remove the fill color (click the tiny X chip on the left end of the palette).
16 -- Let's say that this circle is the right size to create the smallest tic marks. So select the combined 4 lines, which I would assume you want those the smallest. Hold the Shift key and select the new circle at the same time.
17 -- Path menu > Cut Path
18 -- Deselect everything (click in any open area of the canvas). At first, it might look like nothing has happened. But really, Inkscape has cut those lines to the proper length. Now you can just delete the inner sections of those lines, which leaves the tic marks in place. (Select with Selection tool, then Delete.) Here's what it should look like after you delete the inner part of the lines.

 cr2.png
(6.8 kB . 226x214)
(viewed 231 times)19 -- Repeat #14 through #18, for the other 2 sets of lines

 cr3.png
(6.31 kB . 218x216)
(viewed 238 times)
 cr4.png
(6.09 kB . 229x216)
(viewed 225 times)If you want a star shape for the outer profile, you can use the Star tool. One of the tutorials that you were reading explained how to use the Star tool. (The one titled Shapes, I think.)
Let us know how it goes

 This is a read-only archive of the inkscapecommunity.com site. You can search for info here or post new questions and comments at inkscape.org/forums
  This is a read-only archive of the forum.inkscapecommunity.com site. This feature is no longer available.